Save 99% of Time Spent Filling in Blanks in Excel
Every time I’m training staff from various corporates and I introduce this concept, the comments I get at the end is that ‘this is magic!‘ If you don’t know the magic, filling in blanks in Excel is one of the tasks that will leave you feeling that there must be a better way apart from doing it manually.
It can be daunting especially if you have thousands of rows to deal with!
Almost 95% of those I’ve trained indicated they would either (1)copy and paste, (2)auto-fill to blank cells below OR (3)use CTRL+D. All the methods work
But wait a moment…
Wouldn’t it be great to know how to do it like a star and improve your productivity? This posts addresses these inefficiencies.
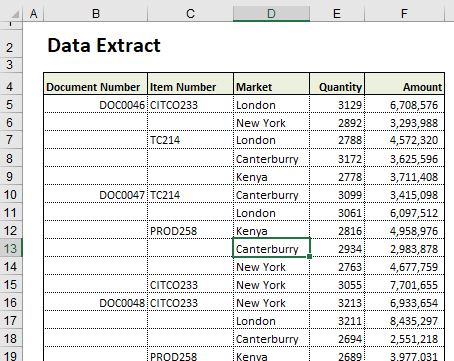
The data structure is as shown below:

Download the workbook to follow along.
Steps to Fill Blanks in Excel
- Select the columns of data that are affected with blank cells. In this example, highlight cells B4:C26
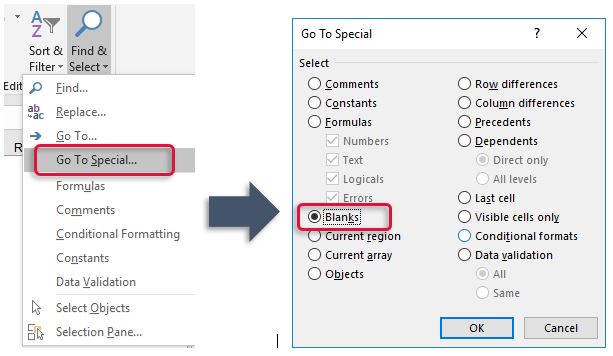
- In the Home menu, Editing group, choose Go-to special… within the Find & Select commands. You can use the keyboard short cut, CTRL+G or tap F5 and click Special from the Go-To window. From the dialog box that appears, select Blanks and press OK

- Excel selects all the blank cells within the selection made in step 1 above.
- With the blank cells selected, tap the “=” sign on the keyboard followed by the Upward pointing arrow on the keyboard to select the cell above the active cell.
- At this point, press CTRL + Enter simultaneously in order to fill all the selected cells at a go!
- The final step is to select the entire data set again and Copy-Paste Special Values ( keyboard short cut ALT+E+S+V or ALT+H+V+V) in the same location. This helps eliminate the formulas created and thus eliminate chances of distortion of data as you try to sort the data later.
What if Excel doesn’t select the blank cells?
- Select the region where you want to find blanks
- Press CTRL+H to find and replace
- In the Find and Replace dialog box, do not type anything in the Find What box. In the Replace With box, however, type a dummy word, say ‘check’, and press Replace All
- While the data set is still selected/highlighted press CTRL+H but this time round reverse the order. That is, in the Find and Replace dialog box, the dummy word ‘Check’ in the Find What box and do not type anything in the Replace With box. Press Replace All.


![Ignite your Excel skills for speed and productivity [How to work faster in Excel]](https://datacycleanalytics.com/wp-content/uploads/2019/07/Excel-Speed-Boosters-500x383.png?x66433)
![Using Excel Power Query to Unpivot Data [Extremely Easy That It Will Shock You]](https://datacycleanalytics.com/wp-content/uploads/2018/09/YouTube-Thumbnail-Using-PQ-to-Unpivot-Data-500x383.png?x66433)


[…] If you have to leave the office at 9pm or later generating a report OR you would spend 4+ hours filling in blanks OR you have to sort your data to get the highest sales, then you need to work on your Excel skills […]
Great, nice trick…
Thanks Gaurav for stopping by.
I hope you find the trick great going forward. How much time has the concept saved you?
This is one of my favourite excel tricks, I love it! I am so surpised so little people know about it. Every time I see someone in the office deleting the blanks manually , I can believe it! Keep up the nice articles.
Spot on. Let’s spread the word
I always need to double check, some values further down the rows, they get replaced with a 0. I don`t know why, but it really is annoying.
I’ve not yet experienced that, Mihai, but yes, a double-check is a must.
It was fantastic, and it saved me a lot of time. The important thing, in my opinion, is to be sure that you are filling in the correct data. This only will be assured once you review quickly your sheet before going with this brilliant step.
Thanks, Gaurav for your fruitfully share
Absolutely
This is a great trick and I have been using it for some time. But have issues when the data set (has fields with no data that I would like to fill) is not blank. Any solution to this will be greatly appreciated.
Am not sure what you mean, David.
Is your situation different from what I’ve described in the last paragraphs above?
Thank you